IP Monitoring Tool Guide
IP Monitoring Tool checks web sites, servers and network devices on a schedule and alerts you when one of them goes down, comes back up, changes or needs attention. Add monitors to the list, click Check Now to test them and Start to monitor them in the background. This guide describes all commands and options of the program.
Contents
- Quick Start
- Monitor Types
- Adding and Editing a Monitor
- Adding Many URLs, Import and Drag and Drop
- The Main Window
- Checking and Monitoring
- Alerts and Notifications
- Viewing Page Changes
- Event Log
- Settings
- Taskbar Mode and Starting with Windows
- Menus and Keyboard Shortcuts
- Export, Print and Copy
- Upgrading from URL Monitoring Tool 2.x
- Troubleshooting Tips
- System Requirements
Quick Start
- Click Add on the toolbar (or press Insert). Enter a URL such as https://www.example.com/, or a host name or an IP address, choose the monitor type and click OK. If the clipboard contains a URL, it is already filled in.
- Repeat for every site or server you want to watch, or use File > Add Multiple URLs to paste a whole list.
- Click Check Now to check all monitors at once. The Status column shows Up, Down, Changed or Warning.
- Click Start. Each monitor is now checked at its own interval, also while the window is hidden in the notification area.
- Open Settings to choose how you want to be alerted.
Monitor Types
| Type | What is checked | Alert |
|---|---|---|
| Web page (HTTP) | The server answers the URL with a success code (any 1xx–3xx), or with the exact status code you specify. HTTP and HTTPS. | Down / back up |
| Content change | The text of the page is compared with the text of the previous check. | Content changed |
| Keyword | A word or phrase must be on the page, or must not be on the page. | Down while the condition fails |
| Ping | The host answers ICMP echo (ping) requests. IPv4 and IPv6. | Down / back up |
| TCP port | A TCP connection to the port succeeds within the timeout. | Down / back up |
| DNS | The host name resolves. The list of IP addresses is recorded and compared at every check. | Down, addresses changed |
Use Web page to know that a site is online, Keyword to make sure that the page really shows what it should (for example your company name, or that an error message such as "Database error" is not shown), Content change to follow updates of a page, Ping for routers, servers and other devices, TCP port for mail, FTP, SSH, database and Remote Desktop servers, and DNS to detect unexpected changes of your domain's addresses.
Adding and Editing a Monitor
Click Add (Insert) to add a monitor. To change a monitor, select it and click Edit, press Enter or double-click it. Edit > Duplicate creates a copy of the selected monitor that you can change, for example to watch the same server on another port.
| Monitor type | One of the six types described above. |
| URL / Host name | For web page, content and keyword monitors: the full URL. A bare host name gets "http://" in front of it; enter "https://" for secure sites. For ping, TCP port and DNS monitors: a host name or an IP address. |
| Name | Optional. The name shown in the list, notifications and event log; if empty, the URL or host is shown. |
| Port | For TCP port monitors. Choose a common service from the list (HTTP 80, HTTPS 443, FTP 21, SSH 22, SMTP 25/465/587, POP3 110/995, IMAP 143/993, DNS 53, LDAP 389, SMB 445, SQL Server 1433, Oracle 1521, MySQL 3306, PostgreSQL 5432, Redis 6379, MongoDB 27017, Remote Desktop 3389, VNC 5900, 8080) or type any port 1–65535. |
| Check every | The check interval in seconds, minutes or hours, from 10 seconds to 7 days. |
| Timeout | How long to wait for an answer, 2–120 seconds. |
| Failures before alert | How many checks in a row must fail before the monitor is shown as Down and you are alerted (0 uses the value from Settings). After a failure the monitor is checked again sooner, within 30 seconds, so a real outage is confirmed quickly. |
| Monitor enabled | Clear it to pause the monitor without removing it. |
Web page / server options
| Use HEAD request | Asks only for the headers of the page. It is faster and uses less traffic; some servers do not support it — clear the option if a working site is reported as down. |
| Ignore TLS certificate errors | Accepts self-signed, expired or mismatched certificates, for example on an intranet server. Otherwise such problems are reported with a clear reason. |
| Expected HTTP status code | 0 accepts any success code. Enter a code such as 200 or 301 to require exactly that answer. |
| Warn when slower than | Shows a Warning when the response time is above this number of milliseconds (0 = off). |
| Warn when the TLS certificate expires within | Shows a Warning this number of days before the certificate of an HTTPS site expires. |
Page content options
| Keyword | The text to look for, with Alert when the text is missing or Alert when the text appears. |
| Match case | Upper and lower case must match exactly. |
| Compare visible text only | Ignores HTML markup and scripts, so only text a visitor can read is compared or searched. |
| Ignore numbers | Ignores digits, so visit counters, dates, times and prices do not trigger a content change. |
Click Test Now to check the monitor with the current settings before you save it; the result and the response time are shown next to the button.
Adding Many URLs, Import and Drag and Drop
- File > Add Multiple URLs: paste URLs or host names, one per line (blanks, commas and semicolons also separate them), choose the monitor type and the check interval in minutes. Addresses that are already in the list are skipped.
- File > Import URL List: reads a text file with one address per line, or a CSV file exported by IP Monitoring Tool.
- Drag and drop: drop text files or Internet shortcuts (.url files) onto the window. To create a shortcut, drag the address from your browser to the desktop.
The Main Window
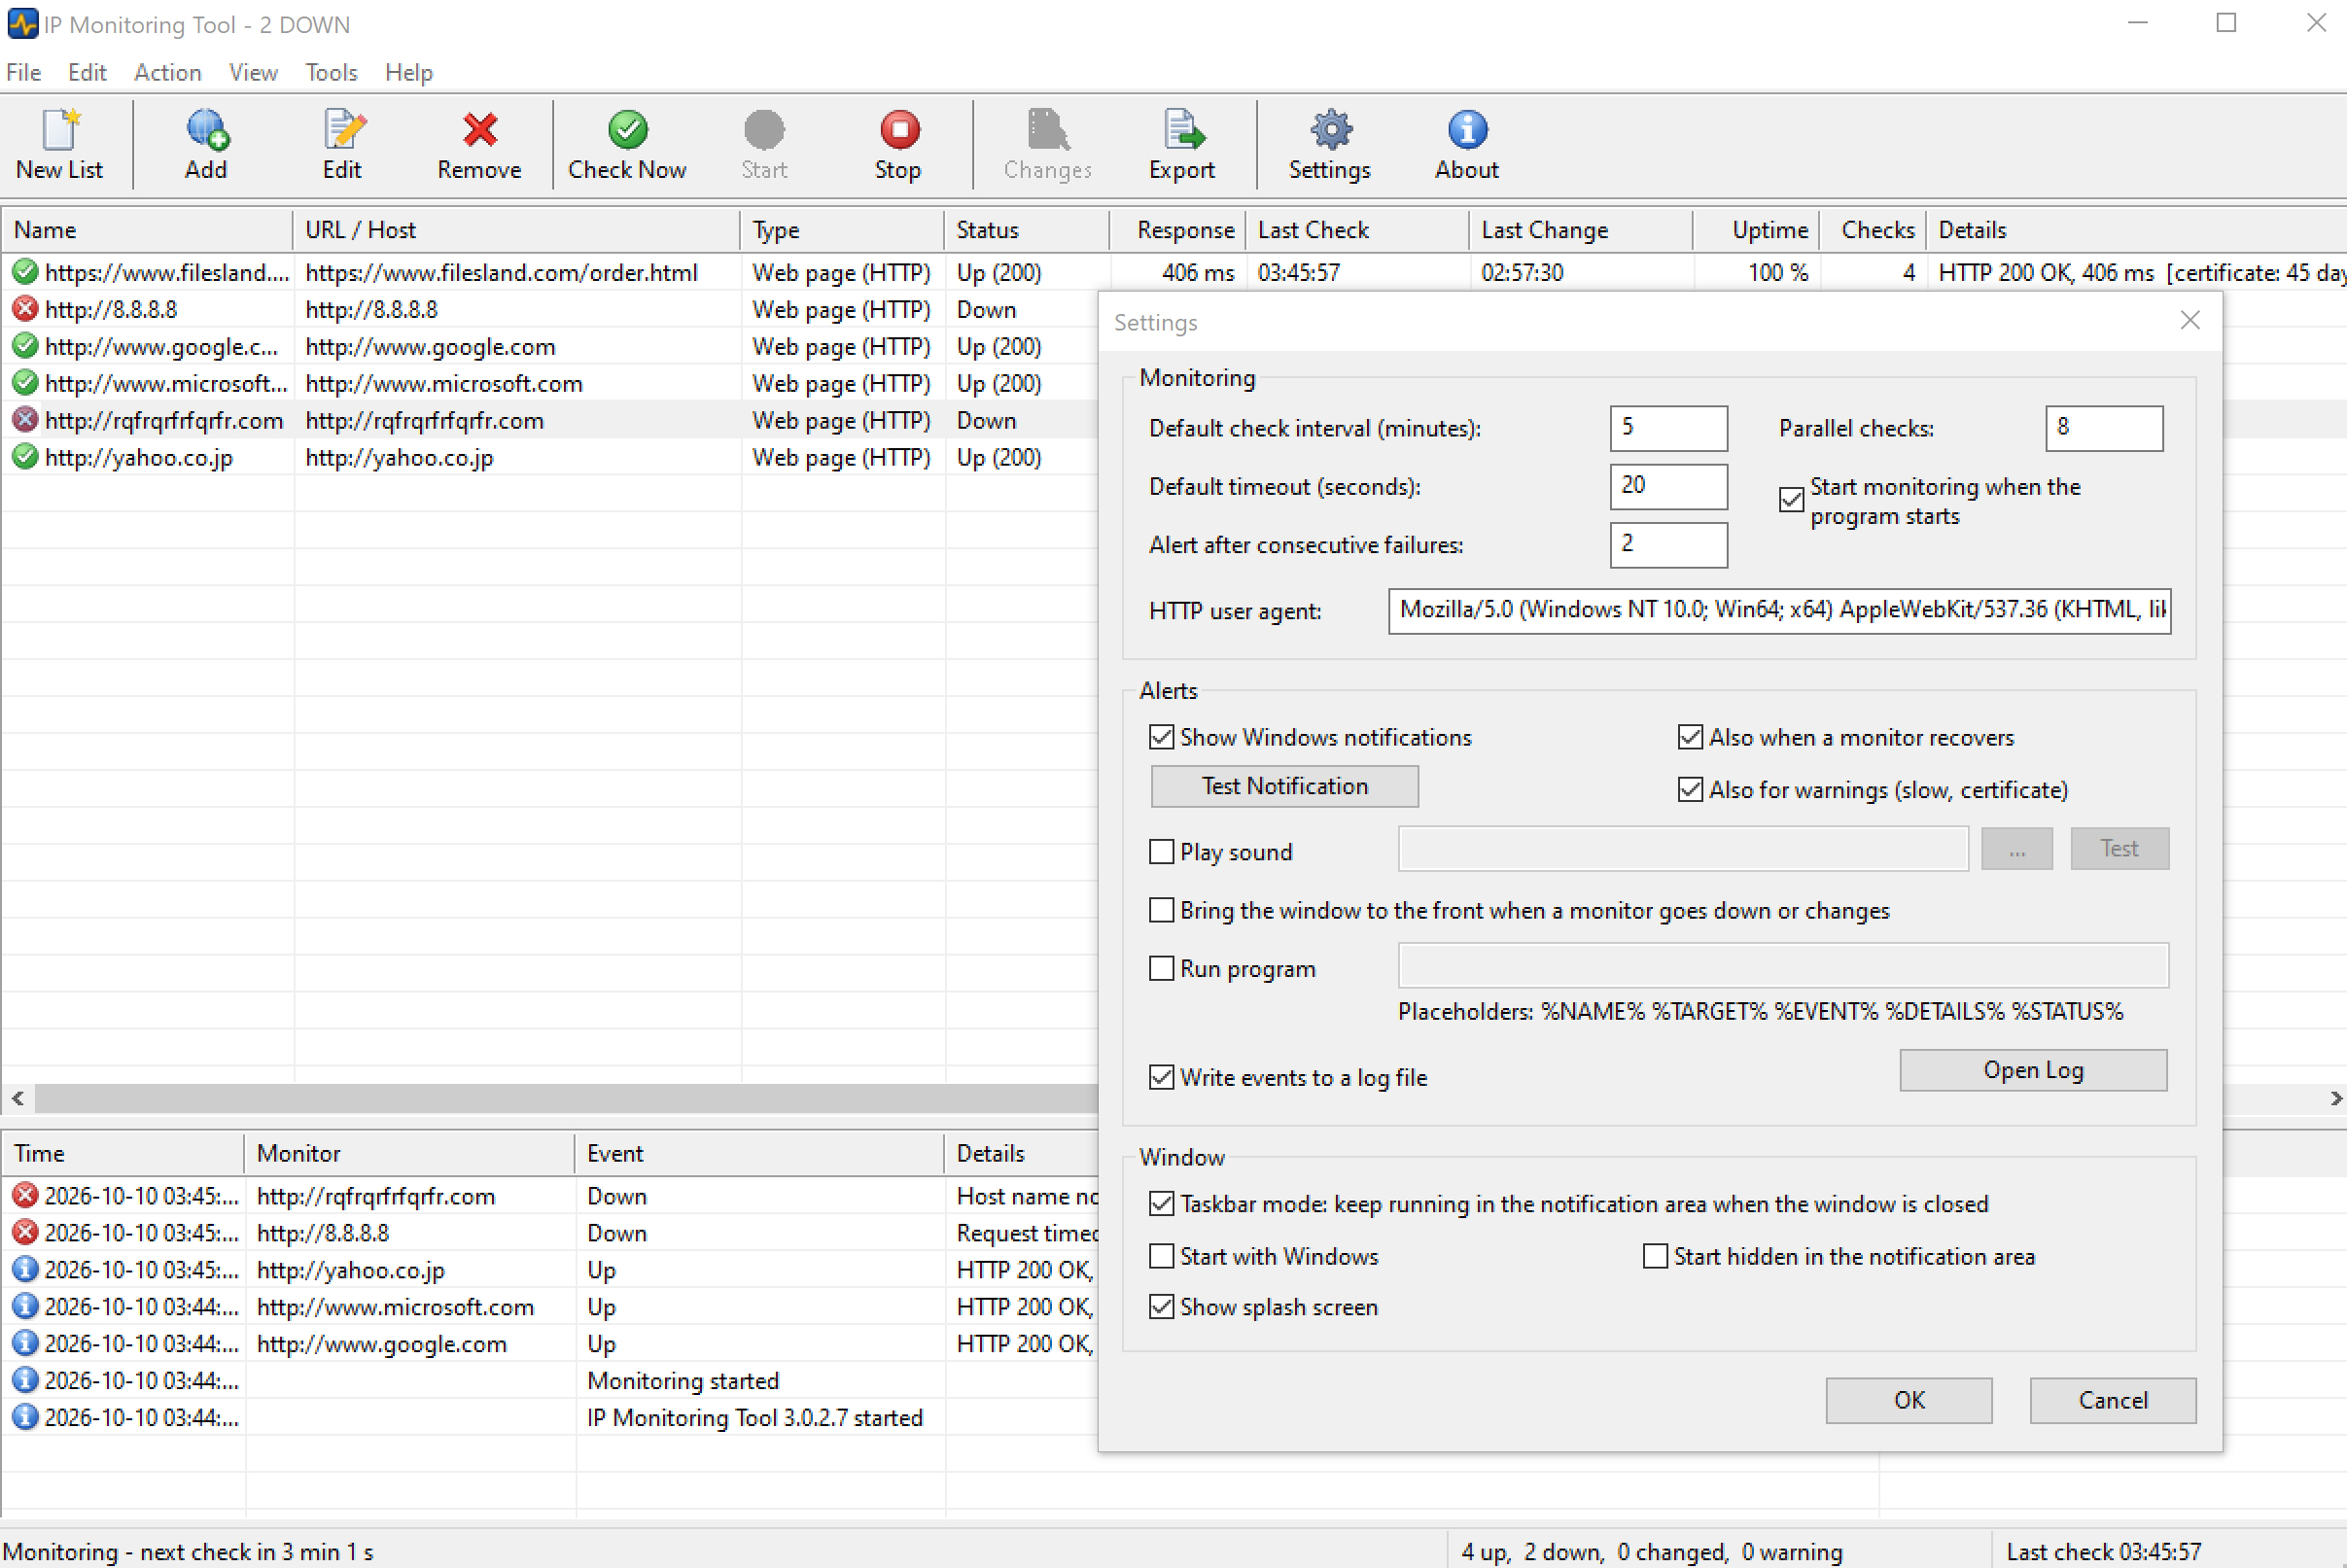
The upper list shows one row per monitor. Click a column header to sort the list; drag a header to reorder the columns. Column widths and order are remembered.
| Name, URL / Host | What is monitored. |
| Type | The monitor type. |
| Status | Up (with the HTTP status code), Down, Changed, Warning, Paused, Checking... or Not checked. The icon in front of the name shows the same state in color. |
| Response | Response time of the last check in milliseconds. |
| Last Check, Last Change | When the monitor was checked last, and when its state or content changed last. |
| Uptime, Checks | Percentage of successful checks and the number of checks. Action > Reset Statistics starts counting again. |
| Details | Result of the last check, for example "HTTP 200 OK, 406 ms", the reason of a failure, or the days left until the TLS certificate expires. |
The event log below the list can be resized with the splitter between them, and hidden with View > Event Log. The status bar shows whether monitoring is running and when the next check is due, how many monitors are up, down, changed and in a warning state, and the time of the last check. When monitors are down or changed, the window title and the taskbar button show it too, for example "IP Monitoring Tool - 2 DOWN".
Checking and Monitoring
- Check Now (Ctrl+F5) checks all monitors immediately; Action > Check Selected Now (F5) checks only the selected ones.
- Start begins monitoring: every enabled monitor is checked at its own interval. Stop stops it. Select "Start monitoring when the program starts" in Settings to start automatically.
- Edit > Pause / Resume pauses or resumes the selected monitors.
- Checks run in parallel (8 at a time by default, up to 32), so a slow server does not delay the others.
- Action > Open in Browser opens the selected web page in your default browser.
Alerts and Notifications
You are alerted when a monitor goes down, when it is back up, when content or DNS addresses change, and (optionally) on warnings such as a slow response or a certificate that is about to expire. Choose the alerts in Settings > Alerts:
- Windows notifications: a notification appears in the corner of the screen and in the Windows notification center. When several monitors change at the same time, they are listed in one notification. Click the notification to open the program with that monitor selected. Click Test Notification to see how it looks. If no notification appears, check that notifications are turned on in Windows Settings > System > Notifications and that Focus assist / Do not disturb is off.
- Play sound: plays the default Windows sound or a WAV file that you select with the "..." button.
- Bring the window to the front when a monitor goes down or changes.
- Run program: runs a program or a script with parameters. The placeholders are replaced with the
values of the monitor:
%NAME% name of the monitor
%TARGET% URL or host
%EVENT% event, for example Down, Back up, Content changed
%DETAILS% details of the check
%STATUS% new statusC:\Scripts\alert.cmd "%NAME%" "%EVENT%" "%DETAILS%"Use it to send an e-mail or a message, restart a service or write to your own log.
Viewing Page Changes
A content change monitor keeps a copy of the page text from the last two versions. When the page changes, the monitor shows Changed until you look at the change. Select the monitor and click Changes on the toolbar (or double-click the monitor) to open the Changes window. Added lines and removed lines are marked, and the summary tells how many lines were added and removed and when the change was detected. Clear Show only changed lines to see the whole page text.
- Open Page opens the page in your browser.
- Mark as Seen returns the monitor to Up; the next change is reported again. Action > Mark All Changes as Seen does it for all monitors.
- If the page changes all the time because of counters, dates or advertising, select Compare visible text only and Ignore numbers for the monitor.
DNS monitors work in a similar way: the first check records the IP addresses of the host, and you are alerted when the set of addresses changes.
Event Log
Every important event is added to the top of the event log with the time, the monitor, the event and the details: program started, monitoring started and stopped, Up, Down, Back up, Content changed, DNS addresses changed, Warning and Change marked as seen. Double-click an event to select its monitor in the list. Right-click the log to Copy the selected events, Save Event Log to a CSV file or Clear Event Log.
Select "Write events to a log file" in Settings to keep a permanent log; click Open Log to view it. The log file is kept in %LOCALAPPDATA%\IP Monitoring Tool and is rotated automatically when it grows large.
Settings
Click Settings on the toolbar or select Tools > Settings.
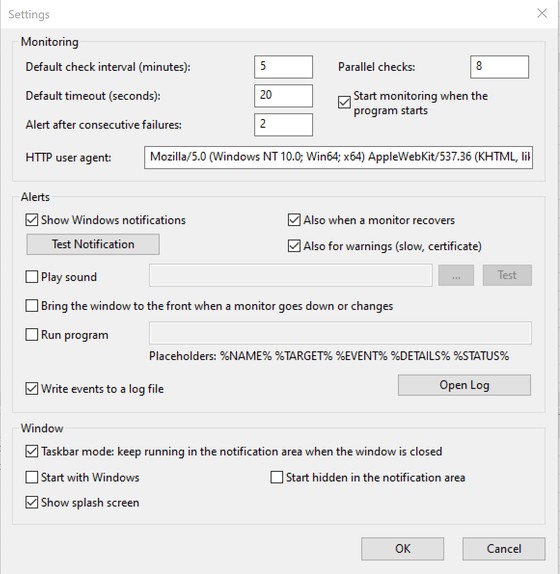
Monitoring
| Default check interval | Interval in minutes for new monitors (default 5). |
| Default timeout | Timeout in seconds for new monitors (default 20). |
| Alert after consecutive failures | Used by monitors whose "Failures before alert" is 0 (default 2). |
| Parallel checks | How many checks may run at the same time, 1–32 (default 8). |
| Start monitoring when the program starts | Starts monitoring automatically. |
| HTTP user agent | The browser identification sent to web servers. Leave the default unless a site blocks unknown browsers; clear the field to restore the default. |
Alerts
| Show Windows notifications | Also when a monitor recovers, and also for warnings (slow response, certificate). |
| Play sound | Windows sound or a WAV file; Test plays it. |
| Bring the window to the front | When a monitor goes down or changes. |
| Run program | Command line with placeholders, see Alerts. |
| Write events to a log file | Open Log opens the file. |
Window
| Taskbar mode | Keep running in the notification area when the window is closed or minimized. |
| Start with Windows | Start the program when you sign in to Windows. |
| Start hidden in the notification area | Do not show the window at startup. |
| Show splash screen | Show the splash screen at startup. |
Taskbar Mode and Starting with Windows
In taskbar mode the program keeps monitoring when you close or minimize the window: it continues in the notification area next to the clock. The tray icon shows the overall state:
| Green | All monitors are up. |
| Red | At least one monitor is down. |
| Orange | A page or DNS record changed, or a monitor has a warning. |
| Gray | Monitoring is stopped, or the list is empty. |
Point to the icon to see the number of monitors in each state. Click the icon to open the window; right-click it for Check All Now, Start Monitoring, Stop Monitoring, Settings and Exit. To close the program completely, select File > Exit or Exit in the tray menu. Only one copy of the program runs at a time: starting it again opens the window of the running copy. Toggle taskbar mode quickly with View > Taskbar Mode; View > Always on Top keeps the window above other windows.
Menus and Keyboard Shortcuts
| File | New List, Add Monitor, Add Multiple URLs, Remove, Import URL List, Export Results (CSV), Save Event Log, Print, Exit. |
| Edit | Edit Monitor, Duplicate, Delete, Pause / Resume, Copy URL / Host, Select All. |
| Action | Check All Now, Check Selected Now, Start / Stop Monitoring, Open in Browser, Show Changes, Mark Change as Seen, Mark All Changes as Seen, Reset Statistics. |
| View | Taskbar Mode, Always on Top, Event Log. |
| Tools | Settings, Clear Event Log. |
| Help | Online Help (F1), Register, About IP Monitoring Tool. |
Right-click a monitor in the list for the most frequently used commands.
| Key | Command |
|---|---|
| Insert, Ctrl+N | Add a monitor |
| Enter | Edit the selected monitor |
| Delete | Remove the selected monitors |
| F5 | Check the selected monitors now |
| Ctrl+F5 | Check all monitors now |
| Ctrl+A | Select all monitors |
| Ctrl+C | Copy the URL / host of the selected monitors (in the event log: copy the selected events) |
| Ctrl+P | Print the list |
| F1 | Open the online help |
| Esc | Hide the window to the notification area (taskbar mode) |
Export, Print and Copy
- Export (toolbar) or File > Export Results (CSV) saves the list with all columns to a CSV file that opens in Excel. The file can be imported back with File > Import URL List.
- File > Save Event Log saves the event log to a CSV or text file.
- File > Print (Ctrl+P) prints the list.
- Edit > Copy URL / Host (Ctrl+C) copies the addresses of the selected monitors.
Upgrading from URL Monitoring Tool 2.x
IP Monitoring Tool 3.0 replaces URL Monitoring Tool. Setup closes and removes the old version, and the program imports your URL list and settings automatically the first time it starts; the event log shows how many URLs were imported. All imported URLs become web page monitors — edit them to use the new monitor types and options.
Troubleshooting Tips
- A working site is shown as Down. Look at the Details column. Try clearing Use HEAD request, increase the timeout, or set the expected status code (some sites answer 403 to unknown programs — then keep the default user agent).
- Certificate errors. "TLS certificate expired", "name does not match" or "not trusted" means visitors see a warning in their browsers too. For internal servers with a self-signed certificate select Ignore TLS certificate errors.
- Ping fails but the site works. Many servers and firewalls block ping. Use a web page or TCP port monitor instead.
- Too many content change alerts. Select Compare visible text only and Ignore numbers, or use a keyword monitor.
- Short outages cause alerts. Increase Failures before alert.
- The site is down only for you. A DNS problem at your provider or a network failure on the way to the server may make a site unreachable from some locations only. Check it from another network or device before contacting your hosting provider.
System Requirements
Windows 10 or Windows 11. Internet or network access to the monitored sites and servers. The program, its settings and your list of monitors are stored per user; the event log file and page snapshots are kept in %LOCALAPPDATA%\IP Monitoring Tool. Uninstalling removes the program, its shortcuts, the "Start with Windows" entry, the log file and the page snapshots.
Evaluation and Registration
You may evaluate IP Monitoring Tool free of charge for 30 days. To continue using it after the evaluation period, please purchase a license ($19.95). Select Help > Register in the program, or click Order below.